How to make easter bunny wax seals + envelope folding bonus
These Bunny wax seals are the perfect seals to add to your easter baskets or gifts this year! I'll walk you through how to make them as well as how to fold a cute and simple envelope out of craft paper. Let's jump in!!
Watch the full YouTube tutorial here:
Supplies you’ll need:
Blank wax seal stamp
Sealing wax beads (I’m using the purple and yellow from this set)
White sealing wax sticks
Wax Seal Warmer
Wax Seal Spoon
Parchment paper
Ink Pen
Craft Paper
Glue dots
How to make them:
First melt the sealing wax. I didn’t have any gray beads on hand, so I combined a purple and yellow (complimentary colors) to get a grayish color. It takes several minutes for the wax to fully melt. Once it does, mix the colors together with a toothpick. Then pour two circles of wax onto the parchment paper and press with blank wax seal stamps. I also did this with white sealing wax sticks that I warmed in a low-temp glue gun. Once the seals cool (about 30-60 seconds), remove the stamps and set aside the seals.
Next create little ears: add a small dot of wax and pulling it away quickly at the end. Use scissors to clip off the excess. I also created dots for little bunny tails. Allow 30-60 seconds for these items to cool and them move them aside.
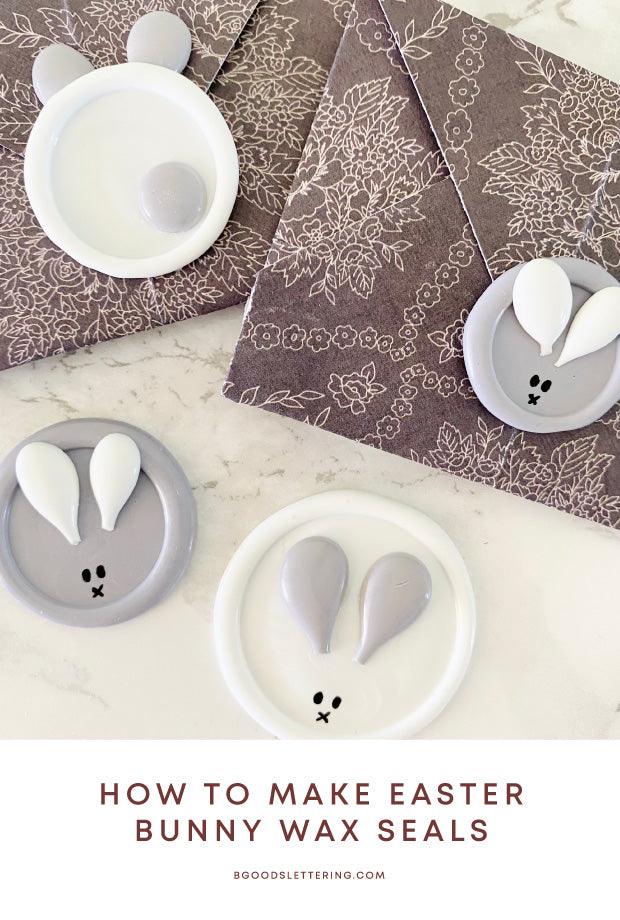
Then, use super glue or more sealing wax to attach the ears and bunny tail. The super glue worked, but took a while to dry. Next time I think I would just use a dot of sealing wax to adhere them. The last step is to use an ink pen to add in the eyes and nose. Make sure to give it plenty of time to dry so that it doesn’t get smeared.
I also made a fun envelope out of a square piece of paper in this tutorial, so watch until the end to see how to do that as well. They would make super cute little easter cards or a fun addition to an easter basket.
Let me know if you try it! Be sure to like this video and subscribe to see the more wax seal tutorials! If you try this technique, tag me @bgoods.lettering on social (IG, FB, TikTok, Pinterest, etc.)!
If you love wax seals, join The Wax Seal Club! It’s an every-other month subscription with a unique wax stamp and sealing wax! Join the waitlist here.
Leave a comment
This site is protected by hCaptcha and the hCaptcha Privacy Policy and Terms of Service apply.